How to Generate Synthetic 3D Data with Bifrost
May 23,2023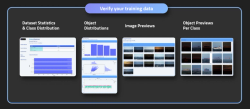
- Synthetic data can be used to bootstrap and train AI models without the need for real-world data
- In this blog post, you will learn step-by-step how to easily generate a large synthetic dataset of 3D images and environments
Collecting data costs considerable time and money!
One of my first major contributions to the world of AI and computer vision was DeepPlastic —a computer vision model and dataset used to detect marine plastic debris in the ocean.
In order to create this dataset, my team and I had to go through incredible challenges that included renting boats, scuba diving up to 40 meters, and working with organizations requiring strict security clearance requirements.
💡It cost more money in labor and time collecting high quality data for training our computer vision model, than any other step during the model development/hosting process!
Most traditional dataset distributions use a train/valid/test split variation in the range of ~80%/10%/10%. While getting that smaller portion of real world validation and testing data plays a critical role in building a successful ML algorithm—bootstrapping your training data will greatly accelerate the training process while drastically lowering time and cost!
Components of a fully synthetic dataset
🤔A fully synthetic dataset generated by AI will often times be referred to as a “synthset”
A synthset consists of the following components:
- Objects and classes: the 3D objects a computer vision model will be detecting and the class labels used to describe that object’s name/properties
- Environment and weather: the type of environment objects will be rendered in and the weather conditions for that environment
- Sensors: the type of virtual camera that will be used to capture images of objects within the environment
- EX: a virtual RGB digital camera sensor similar to that of a generic mobile phone camera
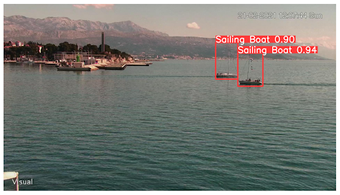
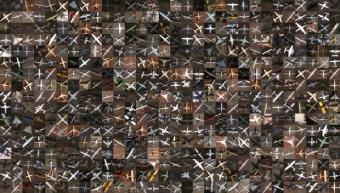
How to generate a synthetic dataset of 3D ships in a maritime environment
Let’s generate a synthetic dataset of 3D ships in a variety of coastal maritime conditions. This dataset could then be used train a computer vision model capable of detecting and/or classifying the various ships.
Step 0: signing up
Head over to the production Bifrost.ai web application (Alchemy) to get started! Click Sign up here! to create your account.
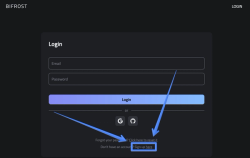
Fig 0 - sign up landing page
Step 1 and 2: add a project and start creating a synthset
💡Projects and synthsets can be used as a form of version control! Use separate projects and individual synthsets as a method of iteration.
The project will store each individual synthset as a separate version within it.
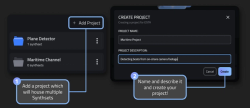
Fig 1 - creating a project to generate and store synthetic data within
Step 3: Select the “maritime” channel
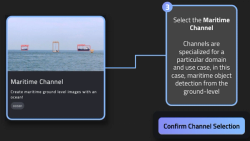
Fig 2 - the selecting the maritime channel
Channels dictate what type of environment will be rendered and how the 3D assets will populate within it.
Step 4: Start generating a synthset
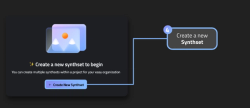
Fig 3 - generating the new synthset
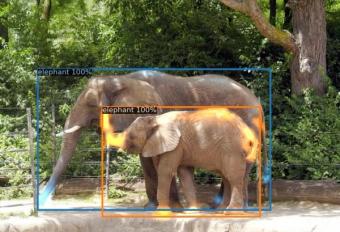
🚨Define object classes in an intentional way that makes them distinct from other similar looking objects! A strong classification ontology will greatly improve model performance and simplify model improvement.
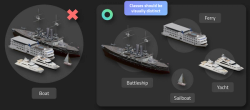
Fig 4 - picking a strong class ontology
Step 5: Select assets for rendering
Choose a large collection of assets, or pick individual assets out of a collection.
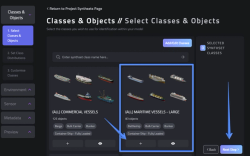
Fig 5 - search for and select the assets to generate within the maritime channel’s environment
Step 6: Select class distributions
💡Use class distribution weights to ensure that datasets have the perfect balance of class representations. This can be used to bootstrap a model with good balance at the start of development, or to rebalance an existing dataset in need of specific classes!
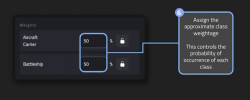
Fig 6 - specifying a 50-50 balance of aircraft carriers and battleships to be present in the synthset
Step 7: Adjust object variance
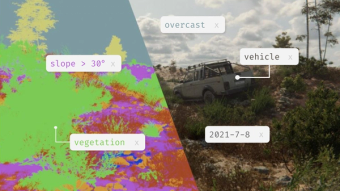
💡Use object positioning to capture under represented angles of your objects. For example, you can specify which direction a boat faces to capture more of the stern if you need samples of the boat facing away from the camera!
Easily adjust the size and location of objects during render time by specifying exact details. See the scale and distance variation charts below for an idea of what the numbers correlate to.
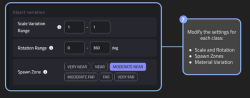
Fig 7 - adjusting the size and position of the ships within the environment
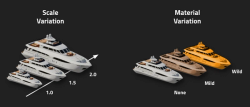
Fig 8 - examples of scale and material variation
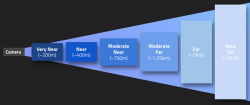
Fig 9 - general distance from camera by spawn zone category
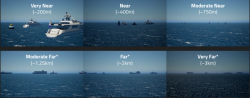
Fig 10 - rendering examples of spawn zone categories
Step 8: Adjusting the environments weather patterns
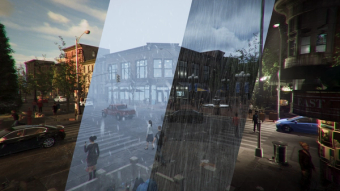
💡Don’t wait for the perfect weather conditions to capture your data! Synthetically generate random or rare environments to capture challenging data scenarios without waiting for it to occur in the wild.
Similar to object’s, the environment can also be tuned to specific weather patterns and their occurrence rate adjusted accordingly.
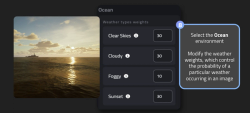
Fig 11 - selecting weather conditions and their occurrence rates
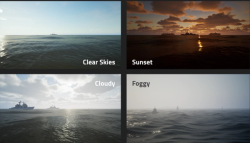
Fig 12 - rendered examples of the maritime weather conditions
Step 9: Choose a virtual sensor to take images with
💡Virtual sensors can replicate expensive cameras, eliminating the need to buy expensive hardware upfront. Get a sense for what data will look like and the efficacy of a sensor before you commit to purchasing it!
Virtual sensors act as the cameras which will take the images in the rendered 3D environment. Select how the sensor should behave and the data type to store images in.
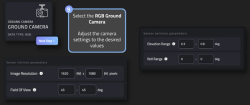
Fig 13 - selecting a virtual sensor’s type and parameters
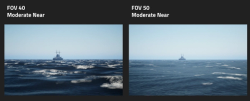
Fig 14 - examples of field of view (FOV) in the rendered environment
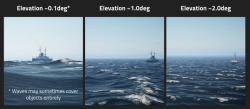
Fig 15 - examples of sensor elevation being applied at different heights within the rendered environment
Last step: Specify number of objects and model annotation format
💡Density of objects present within an image can lead to unique situations and especially difficult to collect in the wild. Ensure you cover all edge cases by having the appropriate amount of sparsity in images!
Set a range of distribution for number of objects to render within each image and the resulting annotation file format.
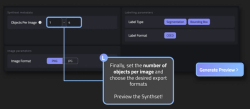
Fig 16 - selecting number of images to render per image and a .coco annotation file format
Review and adjust the quality of the synthetic data
💡Data looking good but needs some adjustments? Simply adjust the settings in the previous steps and generate a new dataset with the ideal properties!
Sample some of the generated images in the resulting synthsets preview window to check how the images turned out.
Each generated dataset will include a dataset_summary.html file containing information about the number of images, annotations, and class details for a dashboard view to the synthset.
Fig 17 - examples of the methods one can use to review the quality of their synthetic data results
Generate a synthset now!
Data forms the lifeblood of innovation. Embrace the power of synthetic data with and forever change the way you approach data-driven challenges.
Create a Bifrost.ai account and start generating synthetic data today! Contact us at sales@bifrost.ai to enable access to the generative channels you need.
https://www.bifrost.ai/request-demo
❓Get stuck and need some help? Reach out to sales@bifrost.ai for timely support!